Docker
2021-12-30T08:33:14.351ZDocker
How can we run an app in a reproducible isolated environment?
Before Docker, we relied on virtual machines to isolate an app from its host environment, but this added too much overhead to be bundled together with the app. The novelty of Docker containers is that they share the OS kernel of the host device, removing this overhead. Containers are much more lightweight than virtual machines.
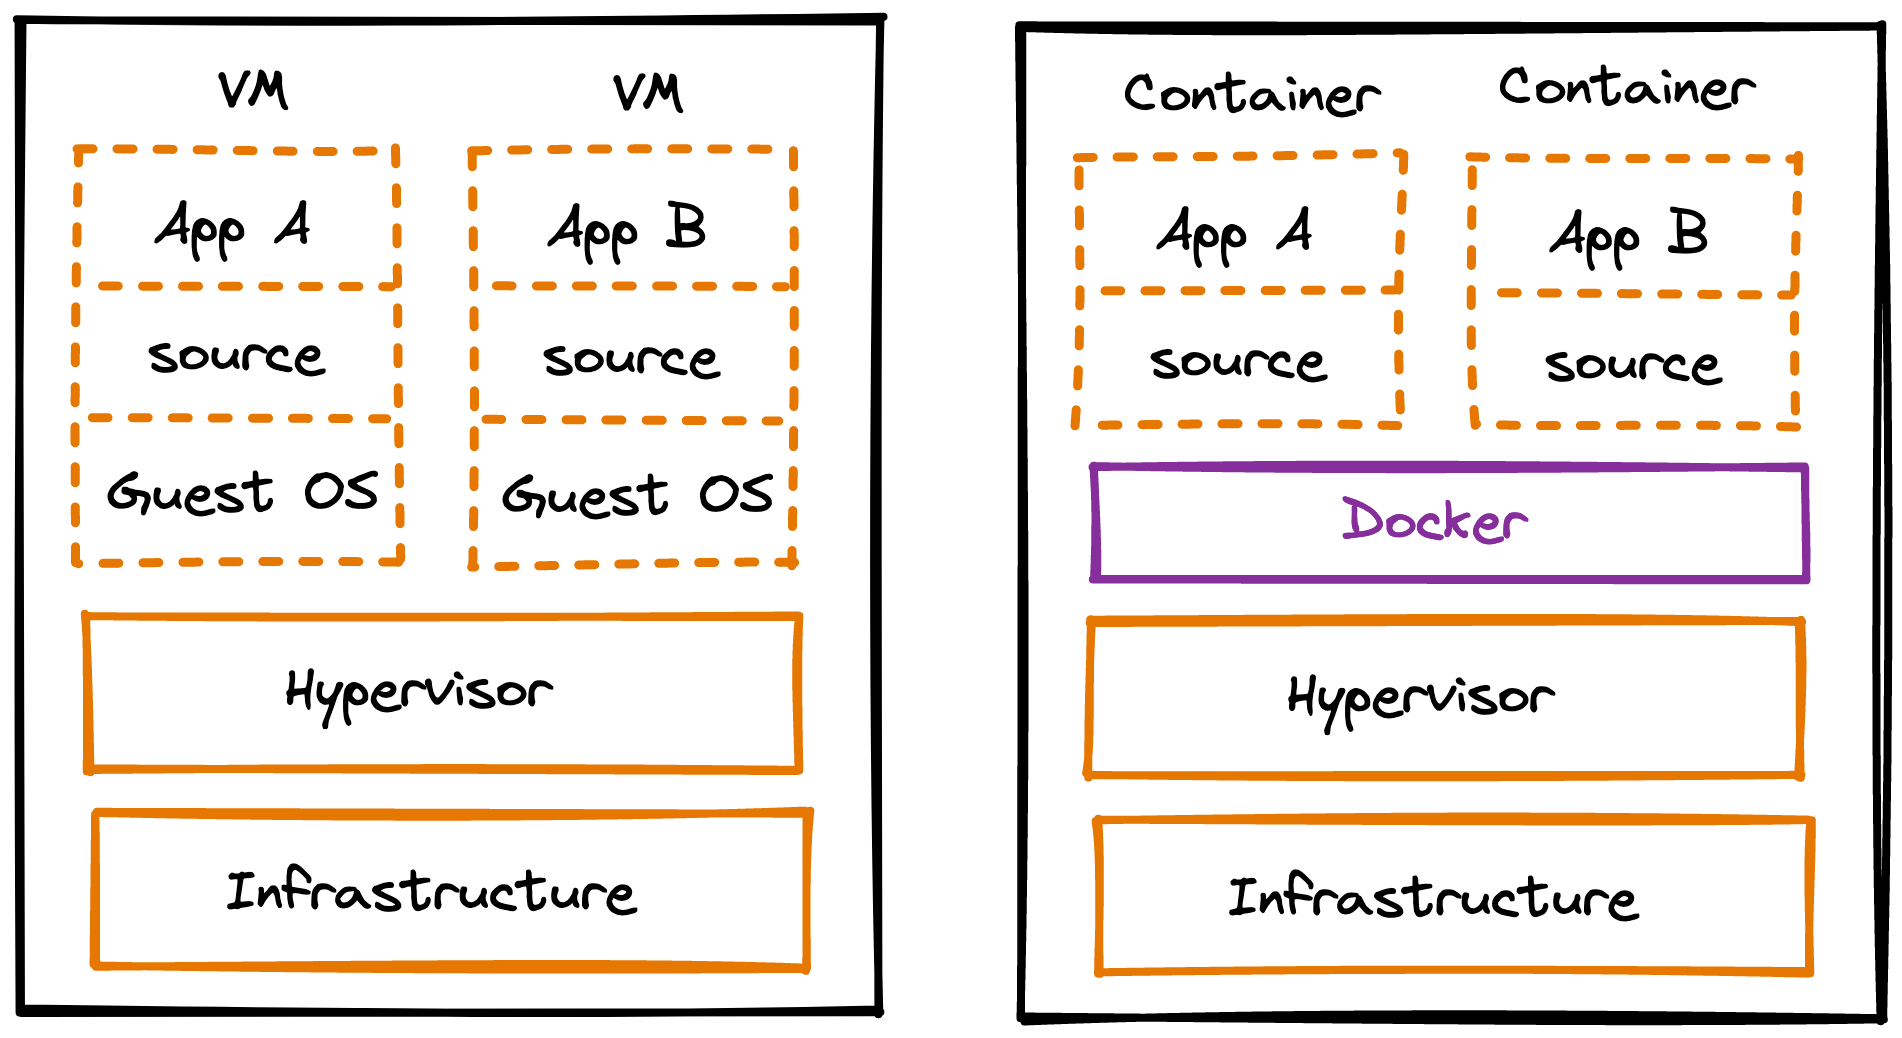
Hence, Docker packages software so that it can run on any hardware, creating an isolated reproducible environment for running an app.
Key concepts:
- Dockerfile, a set of instructions for creating this environment,
- image, the environment that holds everything needed to run the app,
- container, the process running inside this isolated environment,
- volume, a host dir mapped to a container dir to persist data.
Dockerfile
It all begins with the Dockerfile, a set of instructions for creating the environment where an app will run.
For example, these instructions can be:
- first, install the Linux Alpine operating system,
- then, install Node.js v14 in the new environment, and
- inside the file system of the new environment...
- designate a dir as the app dir,
- install the app dependencies in that app dir,
- copy our app files (in the host device) into that app dir,
- set the app's network port and env vars, and
- run the app's main executable.
A Dockerfile is an extensionless text file containing every action that Docker will perform to construct an app's environment. Think of the Dockerfile as a step-by-step recipe. Much like package.json specifies the dependencies that must be installed for a project to run, a Dockerfile specifies the building blocks of the environment that must exist for a project to run.
A Dockerfile starts with FROM to specify a base environment, e.g. ubuntu (the Ubuntu distribution of Linux) or node:alpine (the Alpine distribution of Linux, with Node.js already installed on it). Docker will search in the local file system for the specified base environment. If absent, Docker will download it from Dockerhub.
FROM node:alpine
In this new environment, we can now start setting up what the app will need. First, we use WORKDIR to specify the app's working directory, i.e. the location of the app dir in the new environment. Any instructions after WORKDIR like COPY and RUN will execute with that dir set as working dir, similarly to using cd before running other commands.
FROM node:alpine
WORKDIR /app
Now that we are at the right location in the new environment, we will take care of app dependencies, and then bring in our app's source code.
FROM node:alpine
WORKDIR /app
COPY package*.json ./
RUN npm i
COPY package*.json . copies package.json and package-lock.json from the app dir in the host device into the app dir /app in the file system in the new environment. Note that the target . refers to /app because of WORKDIR /app.
RUN npm i causes the npm bundled with Node.js in the new environment to install the app dependencies, listed in the copies of package.json and package-lock.json located in /app in the new environment, and place those dependencies in /app/node_modules in the new environment. Docker will cache /app/node_modules.
Caching
Why do we separate the copying of package.json and package-lock.json and the installing of dependencies in a separate step? Why not copy all the source code files? Because of caching. Docker will use cached dependencies when building an image - making a small change to the app source code will only require Docker to copy our app code, without reinstalling its cached dependencies.
With all the app dependencies installed in the new environment, we can now bring the app's source code into the new environment.
FROM node:alpine
WORKDIR /app
COPY package*.json .
RUN npm i
COPY . .
COPY . . copies all the files in the current directory in the file system in the host device into the app dir /app in the file system in the new environment. Again, note that the target . refers to /app because of WORKDIR /app.
Copying all the files is undesirable: the /node_modules in the file system in the host device will overwrite the /node_modules created by RUN npm i in the file system in the new environment. Copying package.json and package-lock.json is also unnecessary.
To exclude files and dirs from Docker commands, create a .dockerignore file containing:
/node_modules
package.json
package-lock.json
To specify environment variables required by the app in the new environment:
FROM node:alpine
WORKDIR /app
COPY package*.json .
RUN npm i
COPY . .
ENV API_BASE_URL=https://api.my-app.com
To specify which port the app will listen on at runtime in the new environment:
FROM node:alpine
WORKDIR /app
COPY package*.json .
RUN npm i
COPY . .
ENV API_BASE?URL=https://api.my-app.com
EXPOSE 8080
Finally, we specify the init command to start up the app:
FROM node:alpine
WORKDIR /app
COPY package*.json .
RUN npm i
COPY . .
ENV API_BASE?URL=https://api.my-app.com
EXPOSE 8080
CMD [ "npm", "start" ]
CMD is special in that
- there can be only one
CMDper Dockerfile, and - its args use exec form (array of strings), unlike
RUN, which uses shell form (string).
This is the full set of instructions for creating the environment where the app will run. The next step is to actually create that environment.
Image
The docker build command directs Docker create the new environment based on a Dockerfile:
docker build --tag my-app-environment .
--tag or -t names the created environment. The final . specifies the dir where the Dockerfile is located, in the case the current directory.
Successfully built b909406d737c
The environment created by docker build is an image, i.e. a bundle consisting of the Linux Alpine operating system with its own file system, the Node.js runtime, and the app's dependencies, config info, source code, and init command. This image encompasses everything needed to run the app. If a Dockerfile is a blueprint for how to build a factory, an image is the factory itself.
To view existing images:
docker image ls
All that remains is to run the app from the image.
Container
When we run an app normally, we launch a process in our host device; when we stop the app, we wind down the process in our host device. But when we run an app based on a Docker image, we launch a process in an isolated environment, i.e. a lightweight virtual machine separate from the host environment. Containerizing an app means making it runnable in isolation, independently from the underlying environment.
docker run --name my-running-app my-app-environment
The process running in this isolated environment is a container. A container is therefore a runnable instance of an image - a sandboxed process on the host device. Every container is linked to an image.
We can run multiple containers from the same image or from different images. Whichever the case, containers are isolated from each other and from the host environment. It is best practice to run one container per process, e.g. one container for the server, another for the database service.
Port forwarding
With EXPOSE 8080 we documented that the app will listen to port 8080 in the new environment. However, when we navigate to localhost:8080, we are accessing port 8080 in our host environment. Therefore, to run a Docker container, we often need to "forward" or "publish" (i.e., map) the container port to the host port, since our interaction with the container port can only happen through a host port.
docker run my-app-environment -p 5000:8080
The -p flag maps ports with the syntax hostPort:containerPort. Now, navigating to localhost:5000 will allow us to access localhost:8080 in the container.
Managing containers
When running a container, it is handy to name the container with the --name flag, allowing us to reference it by name instead of ID:
docker run --name my-running-app my-app-environment

# `my-running-app` → container name
# `my-app-environment` → image name
By default, running a container takes over the terminal, so it is also handy to use the -d flag for the container to run in detached mode, allowing us to continue to use the terminal.
docker run -d --name my-running-app my-app-environment
The opposite of detached mode is the --interactive or -it flag, which allows us to run any bash command inside the container.
docker run -it --name my-running-app my-app-environment
To stop a running container:
- If the container is running on an overtaken terminal,
ctrl+c - If the container is running in detached mode:
docker stop <container>
To view containers:
- Running containers:
docker ps - All containers, running and stopped:
docker ps -a
To delete stopped containers: docker container prune
To restart a stopped container: docker start <container>
docker run launches a new container, whereas docker start restarts a stopped container. Neither should be confused with docker exec, which executes a command inside a running container.
Volume
Each container stores data in its own file system - if we delete a container, the container's data is lost, so we should not rely on the container for data storage.
To persist data, we must map a dir in the file system of the host device to a dir in the file system of the isolated environment.
A volume is therefore a directory in the host mapped to a directory in the container - attaching a host dir to a container dir is referred to as mounting a volume. Inside this dir, a container can act on files and their these changes will persist even after the container is stopped. Volumes can be mounted to multiple containers simultaneously, so that containers can share data.
To create a volume:
docker volume create my-app-data
To mount a volume to a container:
docker run -v my-app-data:/app/data my-app-environment