Git
2020-11-19T23:46:37.119ZGit
Sources:
- Pro Git by Scott Chacon and Ben Straub
- The Ultimate Git Course by Mosh Hamedani
Introduction
Git is a popular version control system, i.e. a system for tracking the history of changes made to a codebase over time in a database called a "repository". It is distributed, so every team member has a copy of the entire repo.
Installation:
Recommended tools:
Confirm installation:
git --version
Configuration
Git config may be system-level (all users of the machine), global (all repos of current user), or local (current repo).
git config --global user.name "John Smith"
git config --global user.email "john@smith.com"
git config --global core.editor "code --wait"
git config --global core.autocrlf true
View global settings:
git config --global -e
View help page for commands:
git config --help
Create an alias for a command:
git config --global alias.log5 "log --oneline -n 5"
Repo setup
Initialize a git repo as a .git subdirectory:
mkdir myProject && cd myProject
git init
View the hidden .git subdirectory:
ls -a
Remove the hidden .git subdirectory:
rm -rf .git
Copy remote repo into local directory:
git clone <url>
The clone command also adds the URL as a remote to that repo.
Adding and committing
In Git, we...
- monitor files whose changes matter (tracking),
- make changes to tracked files,
- select changes to be committed (staging),
- persist selected changes to the
.gitrepo (committing).
Tracking and staging
git add instructs Git...
- to start tracking a file, and
- to place it in the staging area.
Staging means monitoring a file for changes. The staging area, also called the "index", is where we prepare the changes that will be in the next commit. That is, the staging area contains what is proposed for the next commit.
Stage changes:
git add file1.js
git add file1.js file2.js
git add *.js
git add .   # excluding deletions
git add -A  # including deletions
Changing a file after staging it
Staging a file "takes a snapshot" of the file as it is in the working tree. Therefore, if you stage a file and change it after staging it, the change will be only in the working tree and not in the staging area, so it will need to be staged again.
Unstaging and untracking
git rm --cached unstages and untracks a file, but keeps it in the working tree. This fixes unintended staging, e.g. we forgot to include a file in .gitignore and accidentally staged it. This removal needs to be committed.
Unstage and untrack a file:
git rm --cached file1.js
git commit -m "Remove unused code"
Remove all untracked files:
git clean -fd
Unstaging
git restore --staged instructs Git to overwrite staged changes with committed changes. Committed changes are copied back, so the staging area becomes equal to the newest commit. This only works if there is at least one commit in the repo.
Unstage a file:
git restore --staged file1.js
Forgetting the --cached flag when restoring
git restore without the --cached flag removes the file from the staging area and from the working tree. In other words, forgetting the --cached flag will instruct Git to discard any unstaged local changes. As a precaution, place the full command git restore --cached in an unstage alias and use the alias instead.
Older option to unstage a file:
git reset HEAD -- file1.js
Older option to unstage all files:
git reset HEAD
Committing
Committing is saving all tracked files into a save state. When we reach a state we want to record, we make a commit. Whenever we commit, the master branch pointer moves forward automatically. Each commit should represent a cohesive unit—no unrelated changes should be committed together. Write meaningful commit messages. Prefer the present tense.
Make a commit:
git commit -m "Message"
Commit and stage simultaneously:
git commit -am "Message"
Staged changes remain staged
After committing, staged changes remain staged, i.e. the staging area does not become "empty". In other words, if we run git add file1.js and then edit that file, we will need to run git add again to stage its latest version. The staging area is similar to the staging environment of a software project to be released into production: the staging area is either a reflection of what we have in production or the next version that will go into production.
Slight differences when using git add
git add -A    # all changes, including deletions
git add .     # all changes, excluding deletions
Housekeeping
Visiting an old commit
View the codebase in an earlier state:
git checkout <commit>
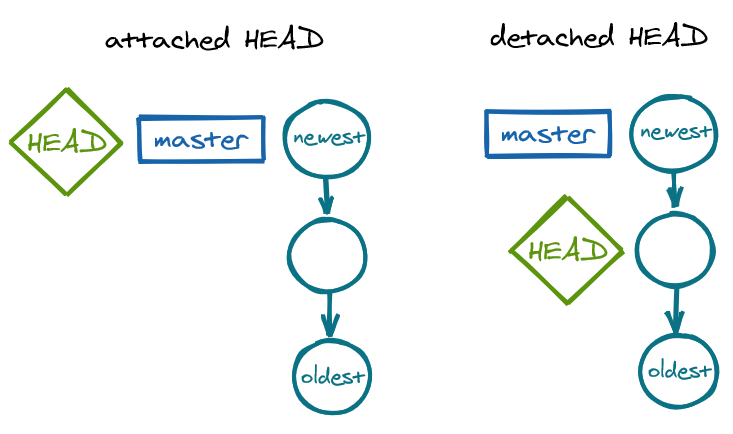
Detached HEAD state
Checking out an old commit causes "detached HEAD state", meaning that the HEAD pointer, which should normally be pointing to the current branch, is now pointing to a commit. It is "detached" because it is not attached to a branch anymore. In this state, we should not make new commits, only look around to view the codebase in a previous state—if we do make a commit in detached HEAD state, it will be garbage-collected!
Checking out master reattaches HEAD to the master branch, solving the detached HEAD state:
git checkout master
Deleting
To remove a file from Git, we need to remove it from our tracked files and staging area, and then commit.
Renaming
Renaming a file causes Git to see a deletion and a new untracked file. This requires staging the deletion and the "new" file.
mv old.js new.js
git add old.js # stage deletion
git add new.js # stage "new" file
Or, instead of the Unix mv command, we can rename a file with git mv. This renames and stages the rename operation.
git mv old.js new.js
git commit -m "Rename file"
Ignoring
Ignore a file pattern:
touch .gitignore
git add .gitignore
git commit -m  "Add .gitignore"
Make sure the file to be ignored is not in the staging area:
git ls-files
Tagging
A tag is a custom label or pointer for a specific commit, e.g. to indicate a version.
Make a lightweight tag for a commit:
git tag v1.0 # current commit
git tag v1.0 <commit> # older commit

git checkout v1.0
View all tags:
git tag
Make an annotated tag for a commit:
git tag -a v2.0 -m "TypeScript added to project"
View all tags with annotations:
git tag -n
Delete a tag:
git tag -d v1.0
Discarding local changes
Copy staged changes into the working tree:
git restore file1.js
This overwrites unstaged changes for that file with staged changes for that file.
History
Viewing commits
Viewing all commits:
git log
git log --oneline               # summarized commits
git log --oneline -n 5          # only five newest
git log --oneline --reverse     # oldest to newest
git log --oneline -all          # all branches
git log only shows the commit history for the current branch.
Viewing status
View the status of the working tree and staging area:
git status

  Changes to be committed:
      file2.txt
      file3.txt

  Changes not staged for commit:
      modified: file0.js
      deleted: file1.js

  Untracked files:
      file4.txt
      file5.txt
View short status:
git status -s
   M fileA.js
  ?? fileB.js
Two columns are shown before the filenames. The right column is the working tree and the left column is the staging area. The red M ("Modified") in the right column for fileA.js means that we have modified fileA.js and not staged those changes. The changes remain in the working tree, hence the M in the right column. The ?? mean an untracked file.
git add fileA.js
git status -s
  M  fileA.js
  ?? fileB.js
The changes to fileA.js have now been staged, so the short status shows a green M on the left column.
If we make more changes to fileA.js while those previous changes are staged, a red M will be shown for the new (unstaged) changes and a green M will be shown for the previous (staged) changes.
git status -s
  MM fileA.js
  ?? fileB.js
If we stage the added file, the ?? will turn to a green A on the left column.
git add fileB.js
git status -s
  M fileA.js
  A fileB.js
Pre-commit review
Review the files in the staging area:
git ls-files
Compare committed to staged changes:
git diff --staged
Compare local to staged changes:
git diff
If all changes in the working tree have been staged, git diff will show nothing.
Branching
A branch is a pointer to the latest commit in a new line of development. When we work on a branch, we extend that new line of development and the pointer follows the newest commit in that new line. By extension, a branch refers to the entire new line of development.
A branch can be worked on...
- while other work has stopped in
master, or - while other work is being done in
master.
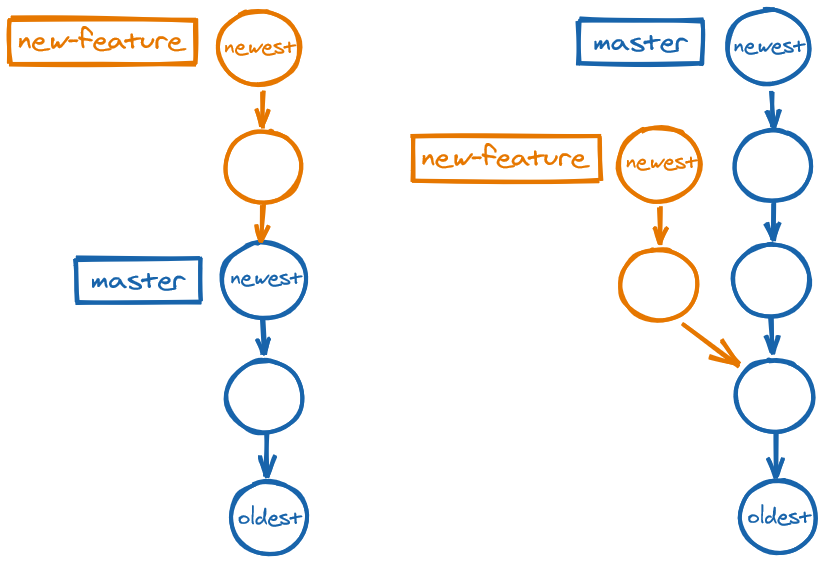 ::figure-caption[A new branch extending
 master vs. a new branch diverging from master
By branching off, we can work on a feature or on a bugfix without our changes affecting the main line of development, master. When the feature or bugfix has been completed, its branch can be merged into master.
HEAD is a pointer to the current branch, i.e. the branch we are currently working on. This means that HEAD is the pointer to the current branch, which in turn is a pointer to the last commit made on the current branch. Therefore, we may think of HEAD as the last commit on the current branch.
Where HEAD is determines what our working tree looks like. When we switch to a branch, the contents of your working tree change to show that commit. A branch is a pointer to a commit—HEAD is a pointer to a branch.
master vs. HEAD pointing to new-featureWhen we are on a branch and we make a commit...
- a commit is added to the current branch (where HEAD is),
- the branch pointer is updated to point to that new commit, and
- and HEAD is updated to point to the current branch.
Creating and switching
Create a branch:
git branch new-feature
Creating a new branch does not automatically move HEAD to that new branch. Our current branch is still in master and we need to move HEAD to that new branch.
View available branches:
git branch
  * master
    new-feature
The asterisk * indicates the current branch. This can also be viewed in a status report.
git status
  On branch master
  nothing to commit, working tree clean
Switch to a branch:
git switch new-feature
# or
git checkout new-feature
HEAD will now be pointing to the branch that has been checked out or switched to.
Create a branch and switch to it:
git switch -c new-feature
# or
git checkout -b new-feature
Managing branches
Rename a branch:
git branch -m new-feature awesome-new-feature
Delete a branch:
git branch -d awesome-new-feature
When we switch branches, Git changes our working tree to reflect the newest commit in the target branch. If we have uncommitted changes (both staged and unstaged) in our current branch and we attempt to switch to another branch, those uncommitted changes will be lost. Therefore, before switching, we need to stash any uncommitted changes. Our working state should be clean when switching branches. Stashing saves the dirty state of the working tree, i.e. any modified tracked files and staged changes.
git status
  On branch new-feature

  Changes to be committed:
      file2.txt
      file3.txt

  Changes not staged for commit:
      modified: file0.js
      deleted: file1.js
git switch another-branch
  error: Your local changes to the following files would be overwritten by checkout:
      file1.js
  Please commit your changes or stash them before you switch branches
  Aborting
Stashing temporarily stores staged and unstaged changes in our current branch, allowing us to go work on another branch and, once we are done, we can come back to the branch we were originally working on, re-apply the stash and resume work on that original branch.
Push uncommitted changes to stash:
git stash push -m "Unfinished work on signup form"
  Saved working tree and index state on new-feature
Alternatively, include any untracked files:
git stash --include-untracked
View stash list:
git stash list
  stash@{0}: On new-feature: Unfinished work on signup form
After switching to another branch and working there, we can resume work in new-feature by switching again and re-applying the stash.
git switch new-feature
git stash apply 1
After finishing work on the unstashed changes, we commit and drop the unneeded stash.
git commit -am "Create signup form"
git stash drop 1
Clear entire stash:
git stash clear
Merging
Merging is applying the changes from one branch to another. We can call the branches involved "provider" and "recipient" of changes. When merging, you should be standing at the recipient branch—think of merging as bringing the changes in some other branch into the current one. At a merge, the active branch is the recipient.
Merge changes from new-feature into master:
git switch master
git merge new-feature
Remember that a branch may extend another or diverge from another. This means that a merge may be...
- when a branch is just an extension of another, a fast-forward merge, or
- when two branches have grown in parallel...
- if combining the two newest tips and adding a new commit, a three-way merge, or
- if mashing together the commits in a branch and adding a new commit, a squash merge.
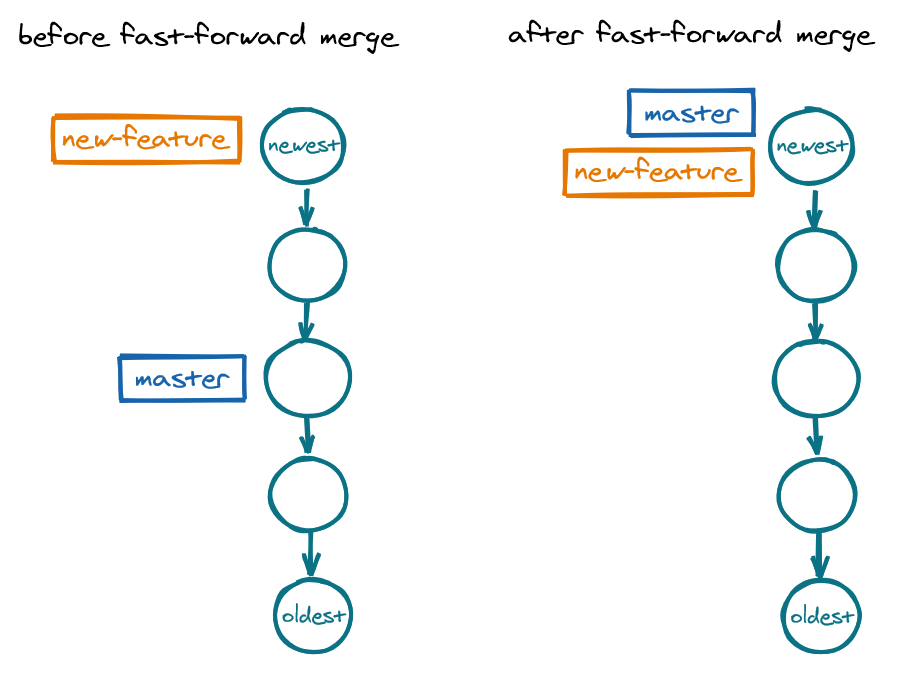
Fast-forward merge
In a fast-forward merge, one branch has extended the other, which means that one branch has grown while the other has stagnated. In other words, the extension branch has all of the changes in the stagnant branch, and then some. A fast-forward merge thus "brings forward" the pointer of the stagnant branch to where the pointer of the extension branch is. In other words, we are just updating the state of the stagnant branch to that of the extension branch.
By default, a fast-foward merge does not create a merge commit, i.e. a commit with more than one parent commit. To create a merge commit in a fast-forward merge, pass in the flag --no-ff.
git switch master
git merge --no-ff new-feature
Whether a fast-forward merge should be done with a merge commit or without it is a matter of preference. Some people argue against it claiming merge commits pollute the history; others argue for it claiming that allow for reverting a feature by reverting the merge commit. (Reverting a commit is creating a commit that is the opposite of a previous commit.)
Set --no-ff as a default:
git config --global ff no
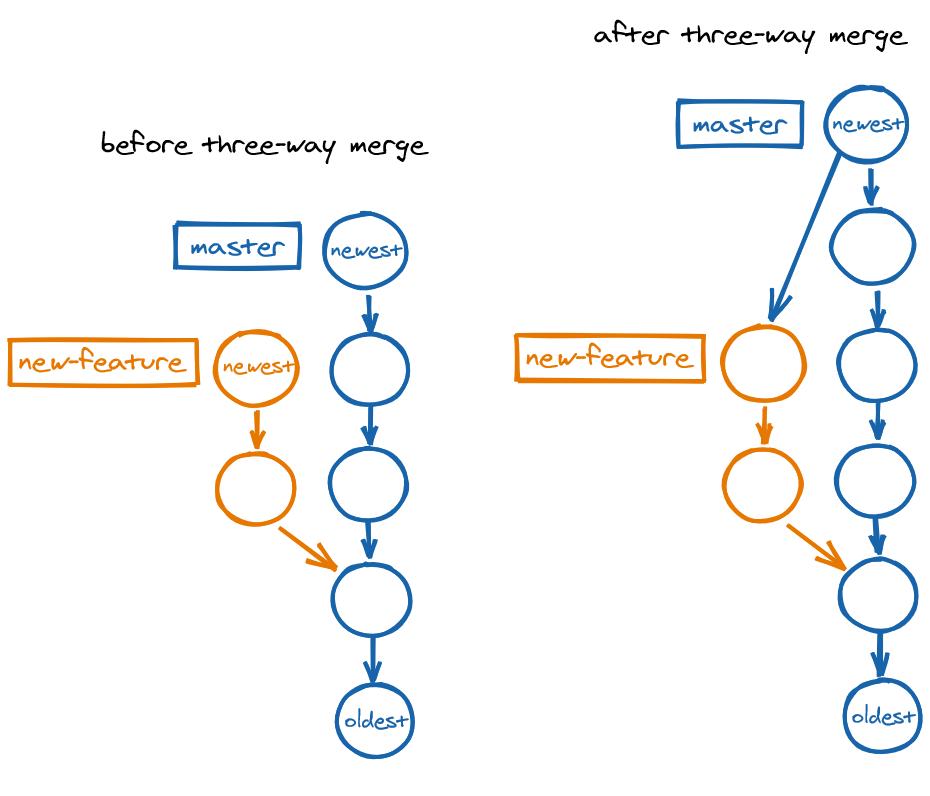
Three-way merge
Instead of a branch extending another, the two branches may have diverged, which means that both branches have grown in parallel, so there are changes that are unique to each branch.
One option here is a three-way merge, which combines the unique changes in both branches to produce a new merge commit, usually placed on the main branch, with its parents being the tips of the two branches. It is called a three-way because Git looks and diffs the tips of the two branches and their common ancestor.
masterSquash merge
A squash merge, another type of merge in case of divergence, consists in mashing together the changes in the commits in the other branch into a single commit, and placing that commit on the main branch. Squash merging produces no merge commit.
git switch master
git merge --squash new-feature
git commit -m "Create new feature"
The commit message should summarize all the work in the new-feature branch.
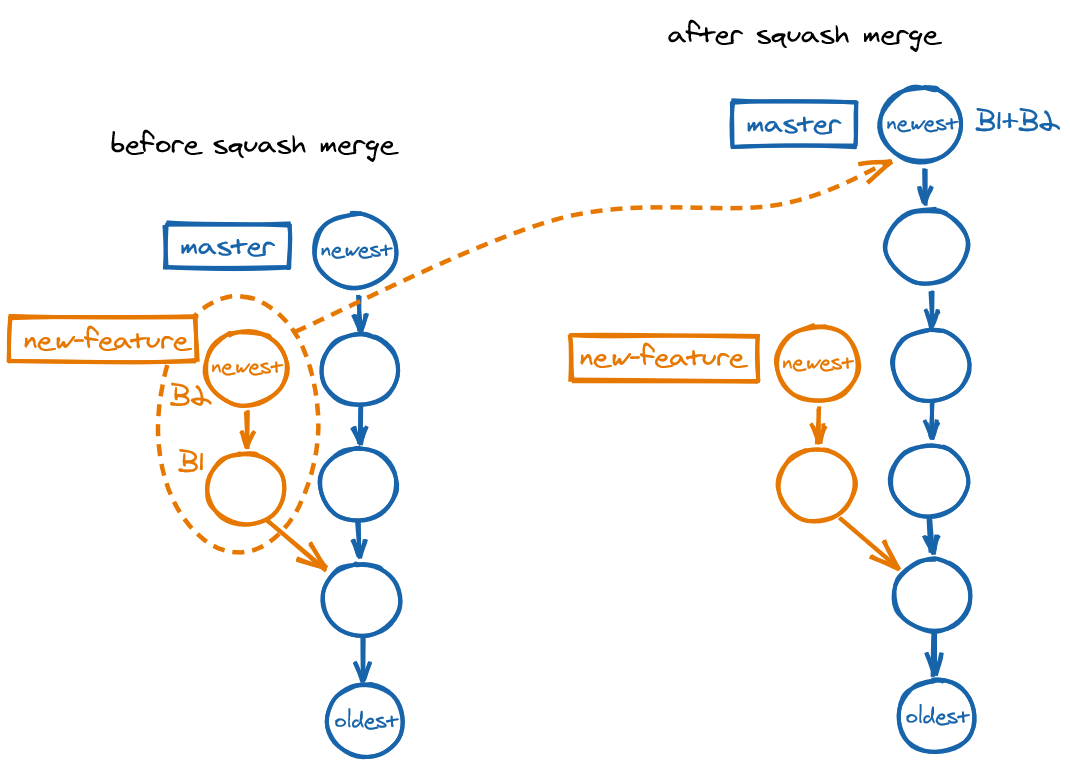
masterEspecially with squash merge, remember to delete the provider branch after committing, because a squash merge will not cause the provider branch to be shown under git branch --merged.
git branch -d new-feature
Post-merge housekeeping
View a list of branches merged into master:
git branch --merged
    new-feature
  * master
If we have merged a branch and are done working on it, we can safely delete it.
git branch -d new-feature
In turn, we can view a list of branched not yet merged into master
git branch --no-merged
Merge conflicts
In a three-way merge, a merge conflict occurs if...
- the same line of code was changed in different ways in the two branches,
- if a line of code was changed in one branch and deleted in the other,
- if a file was added in two branches, but their contents are different
In a merge conflict, the changes cannot be automatically combined.
git switch master
git merge new-feature
  CONFLICT (content): Merge conflict in file1.js
  Automatic merge failed; fix conflicts and then commit the result.
Therefore, we need to manually combine the changes.
git status
  On branch master
  You have unmerged paths
    (fix conflicts and run "git commit")
    (use "git merge --abort" to abort the merge)
  Unmerged paths:
    (use "git add <file>" to mark resolution)
      both modified: file1.js
  no changes added to commit

code file1.js
  <<<<<<< HEAD
  hello
  =======
  goodbye
  >>>>>>> new-feature
Git has paused the merge process until we resolve the conflict. The above are conflict markers, showing the existing state in the current branch and the incoming change in the other branch. <<<<<<< HEAD indicates the version in master, the recipient branch, whereas >>>>>>> new-feature indicates the version in new-feature, the provider branch. ======= is a divider.
To resolve the merge conflict...
- Open the file in a code editor.
- Delete the unwanted version (or keep both versions). Do not introduce any new line while resolving a merge conflict.
- Delete the conflict markers.
- Save and close the file.
- Stage and commit the change.
git add file1.js
git commit
The merge conflict ends once we commit during the merge conflict.
To end the merge conflict without resolving it:
git merge new-feature

# Oh no! Huge merge conflict ahead!

git merge --abort
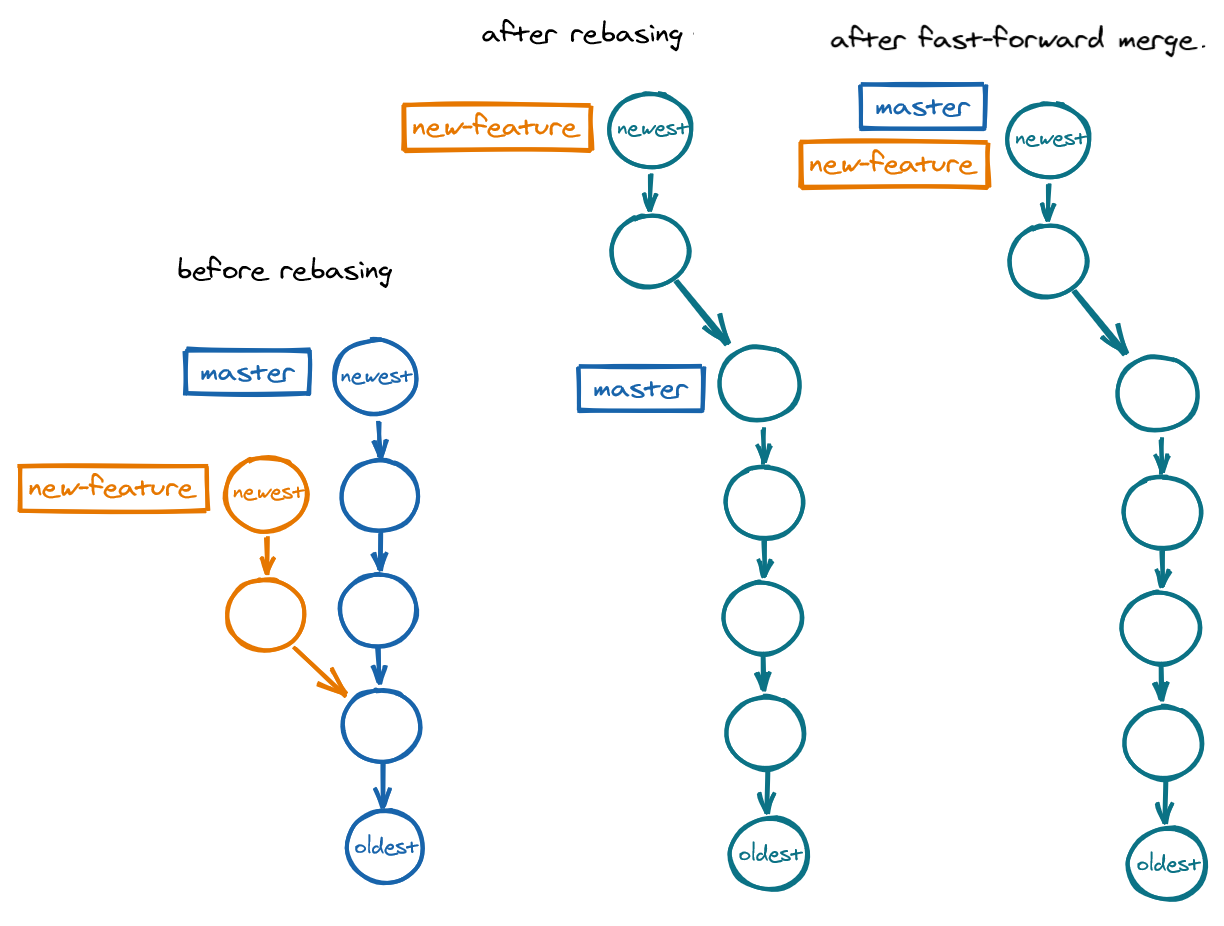
Rebasing
Rebasing changes history!
Only do this if you have not yet shared your work with others.
Rebasing repositions a provider branch onto the recipient branch by grabbing the provider branch at its base and placing it on the newest commit in the recipient branch. This reshapes the graph into linear history, allowing for a fast-foward merge to bring the resulting branch to the newest commit on the provider branch.
Rebase a feature branch onto master:
git switch new-feature
git rebase master         # reposition base of new-feature onto master

git switch master
git merge new-feature     # fast-forward merge to update master to tip
Remotes
We can have a remote Git repo where we can push changes to and pull changes from. A remote is an external repo linked to our local repo. The usual workflow is to fork a source repo, clone our fork into our local machine, create a branch make changes locally, push that branch to our fork, and open a pull request from the branch in our fork to the master branch in the source repo. This is called the fork-and-pull workflow or integration-manager workflow.
origin is the default name for the remote repo linked to your local repo. When forking a project, upstream refers to the source repo and origin refers to our remote repo.
Copy a remote repo into directory in local machine:
git clone https://github.com/user/project.git
This sets our local master branch to track the remote master branch. origin/master is called a remote tracking branch.
View remotes linked to local repo:
git remote
git remote -v
Working with remotes
Upload changes to a remote branch:
git push
The remote origin and the branch master are implied.
Send a branch to a remote:
git switch -c new-feature
git push --set-upstream origin new-feature
--set-upstream links the local branch to the remote branch, which when we first send this branch. The flag can be shortened to -u.
View remote tracking branches:
git branch -r
View local branches linked to remote tracking branches:
git branch -vv
Delete a remote branch:
git push -d origin new-feature
No divergence between local and remote
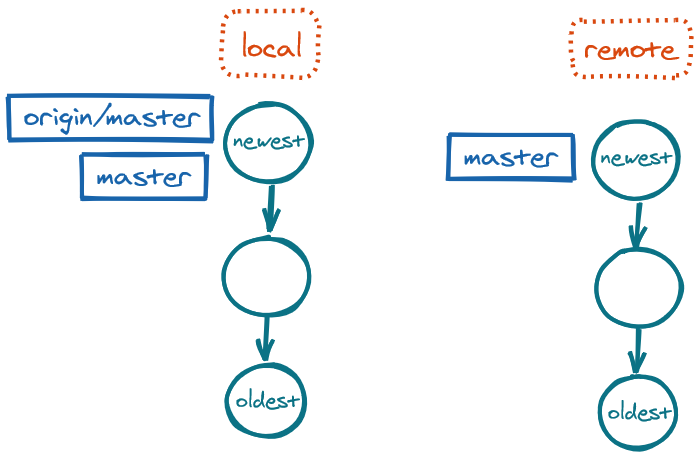
Our local repo is linked to the remote repo, but we still need to keep our local repo in sync with the remote repo (same number of commits) and our local master up to date with origin/master. To keep them in sync, we use fetch to download any changes in the remote repo, and then we use merge to do a fast-forward merge from our master to origin/master.
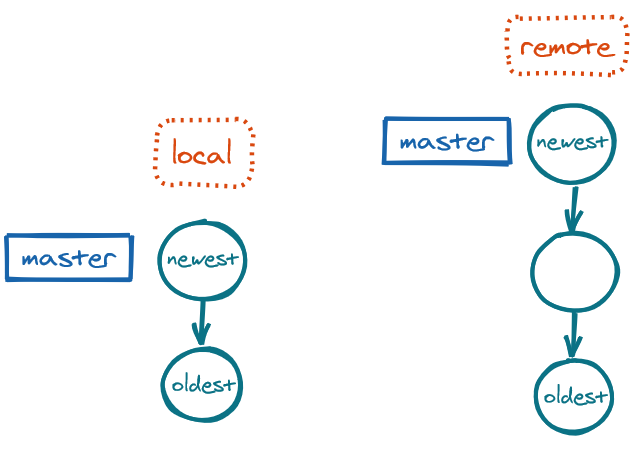
fetch: Branches out of sync, with more commits in the remoteDownload changes in remote:
git fetch
The command git fetch downloads the changes to our local repo, but it does not auto-merge them into our local branch. We need to merge them manually when ready.
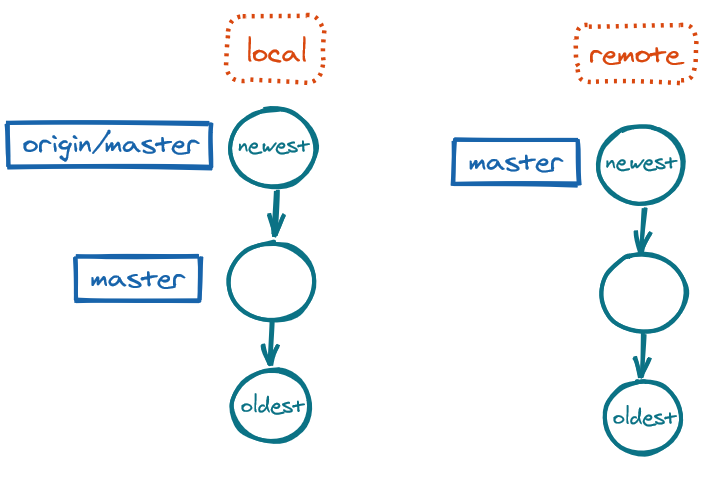
fetch: Branches in sync, with local master outdatedUpdate the local master to origin/master:
git switch master
git merge origin/master     # fast-forward merge
fetch and merge: Branches in sync, with local master now updatedWe can also combine the two fetch and merge commands into a single command:
git pull
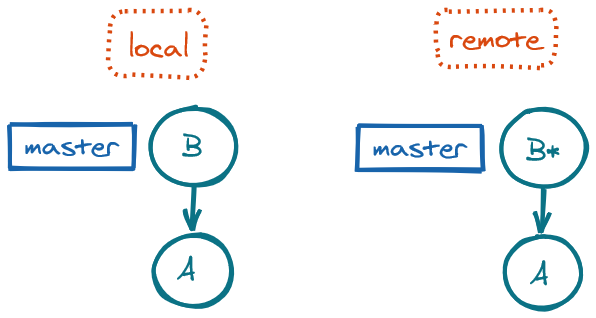
Divergence between local and remote
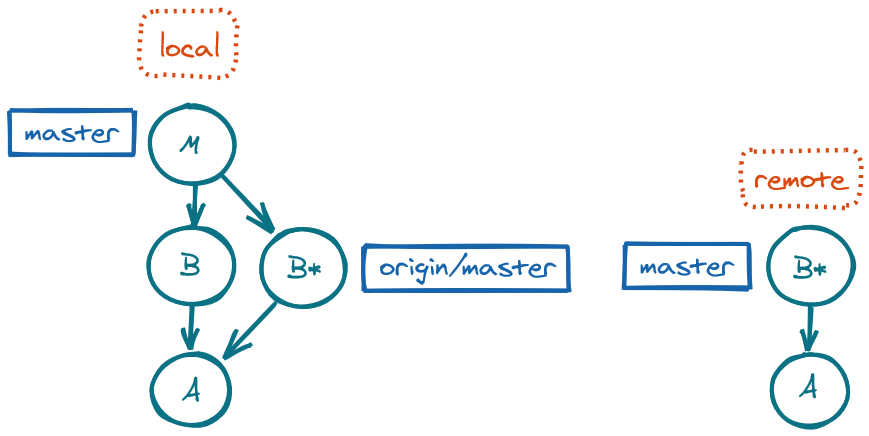
If the local master and the remote origin/master have diverged, i.e. different changes have been made in the two repos and so they are growing in parallel, then the merge from merge or from pull will be a three-way merge, placing the local master at the merge commit.
git pull
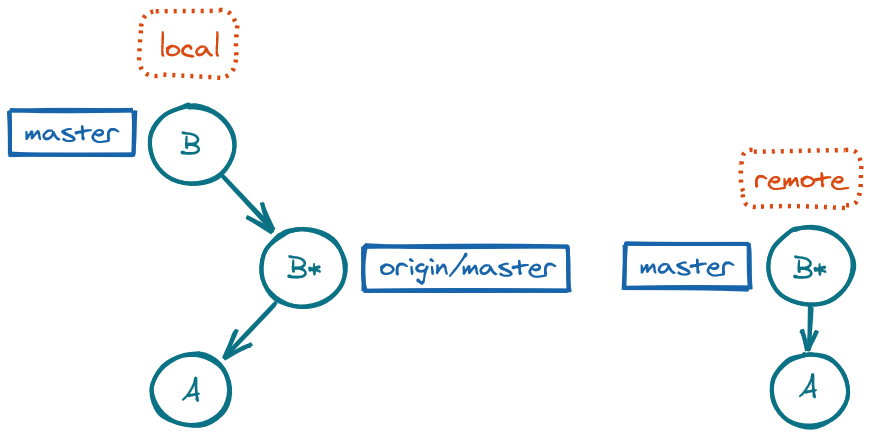
Another option is to use git pull --rebase to fetch the changes and rebase the local master onto the remote origin/master. Whether to use git pull (creating a merge commit) or git pull --rebase (repositioning the local changes onto the remote changes) is a matter of preference.
Remote housekeeping
Link a local repo to a remote repo:
git remote add origin <url>
Download changes from a remote branch:
git pull origin <branch>
Keep our fork in sync with its source repo:
# add another remote (upstream, i.e. source repo)
git remote add upstream https://github.com/user/project.git

# bring upstream's changes into local master
git fetch upstream
git switch master
git merge upstream/master

# send those changes into origin master
git push origin master

# bring those changes into the branch we are working on
git switch new-feature
git merge master
Rename a remote:
git remote rename upstream source
Remove a remote:
git remote rm upstream
Fixes
Do not rewrite public history!
If we have pushed our commits to share them with others, those commits are public and should not be modified. Rewriting history in a local repo is fine—it is even advisable to clean up your work before sharing it with others. We should not push work until we are happy with it.
Major fixes
If we have not shared our commits with others, we can reset. If we have shared our commits with others, we should revert.
Resetting
Resetting changes history!
With git reset we can go back to an older good commit before a newer faulty commit.
Note that git checkout <commit> moves HEAD back to that commit but keeps the branch pointer where it is, causing detached HEAD state, as this is meant for visiting an older state temporarily.
By contrast, git reset <commit> moves both HEAD and the branch pointer to that commit, as this is meant for going back to an older state permanently. The faulty commit we moved back from will be orphaned and garbage-collected. Orphan commits are those with no parents, i.e. lacking no other commits pointing to them and lacking a branch pointer.
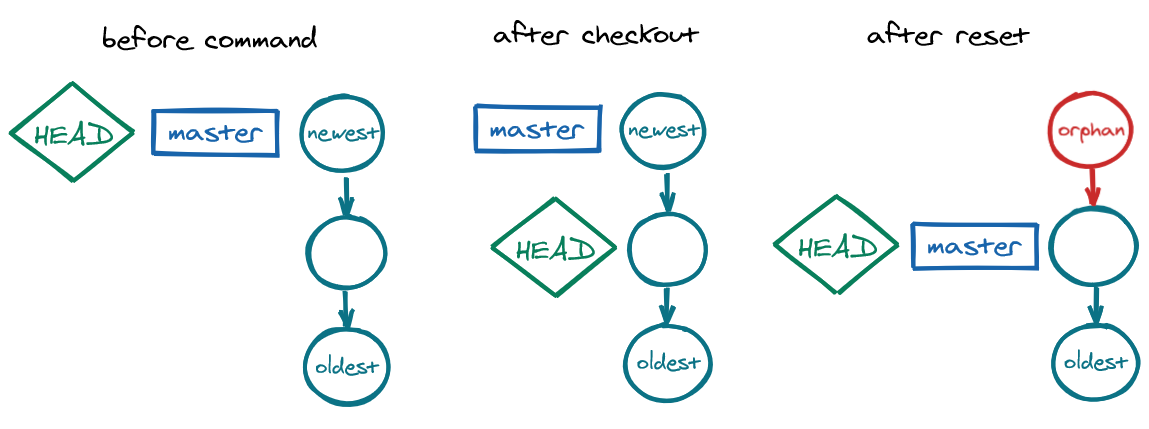
git checkout (visiting) vs. git reset (moving back permanently)Go back one commit permanently:
git reset HEAD~1
The command git reset moves HEAD and branch to the referenced commit.
| Flag | Effect |
|---|---|
--soft |
Staging area and working dir unaffected |
--mixed |
Staging area overwritten with referenced commit (default) |
--hard |
Staging area and working dir overwritten with referenced commit |
Reverting
Add a new commit that undoes changes in the newest commit:
git revert HEAD
Revert a faulty merge:
git revert -m 1 HEAD
The 1 references the first parent (last commit on master before the merge) and HEAD references the current faulty merge commit.
Retrieving lost commits
If we have done a git reset --hard and realize that we need those changes that we have made inaccessible, we can find the hash for the "lost" commit in the reflog.
git reflog
git reflog shows the recent movements of the HEAD pointer. We can view the hashes for the position of HEAD at every recent operation, copy the hash and reset to it.
git reset hard <hash-found-via-reflog>
Small fixes
Reword the message of the newest commit:
git commit --amend
Include a forgotten change in the newest commit:
# make change
git add -A
git commit --amend --no-edit
Interactive rebasing allows us to...
- squash commits together into a single commit,
- reword old commit messages,
- drop commits,
- and much more.
git rebase -i <hash>
Note that commits in an interactive rebase are listed in oldest-to-newest order, that is, the reverse of the list shown by git log.
Rebasing rewrites history!
We should not rebase commits that other people may have based work on.
Undelete a file:
git rm hello.txt
git commit -m "Mistakenly delete file"

# Oh no! I shouldn't have deleted that!

git checkout HEAD~1 hello.txt
git commit -m "Undo deletion"
Restore the state of a file:
echo "bad stuff" >> file1.js
git add file.js
git commit -m "Mess up file"

# Oh no! I shouldn't have committed that change.

git restore --source=HEAD~1 file1.js